A lot of people might be new to Android, while some are
Android gods but in one way or the others, might not know this. A lot desired
of people gets Lollipop updates even though we are passionately ready to
welcome Android M.
Android gods but in one way or the others, might not know this. A lot desired
of people gets Lollipop updates even though we are passionately ready to
welcome Android M.
It is paramount to note that, before you perform any upgrade
on your Android device, It is adviceable to first of all unroot your device if
you are rooted, to avoid story that touch.
on your Android device, It is adviceable to first of all unroot your device if
you are rooted, to avoid story that touch.
Before you begin to unroot your android
phone, make sure you have done the following:
phone, make sure you have done the following:
==>Backup your data:
While unrooting, all the data will be wiped out. so make sure to backup all
your important data either on your SD card or your PC.
While unrooting, all the data will be wiped out. so make sure to backup all
your important data either on your SD card or your PC.
==>Charge your phone:
Ensure that battery is charged to more than 60%.
Ensure that battery is charged to more than 60%.
Method ONE: Super User App
This method works for all android devices that were rooted
without installing custom recovery.
without installing custom recovery.
1. First,
download and install SuperSU app from Play Store.
download and install SuperSU app from Play Store.
2. Launch
SuperSU app, go to Settings, and tap on ‘Full unroot’.
SuperSU app, go to Settings, and tap on ‘Full unroot’.
3. It
will confirm you just tap continue. After successful, Unroot superuser
will close automatically
will confirm you just tap continue. After successful, Unroot superuser
will close automatically
4. Restart
your device
your device
5. Uninstall
SuperSU and you are fully unrooted.
SuperSU and you are fully unrooted.
Method TWO: ES File Explorer
1. Install ES File Explorer app on
your device. Don’t move it to SD card.
your device. Don’t move it to SD card.
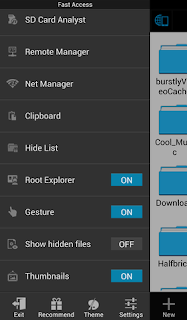
2. Open the app and tap the menu button
3. Now tap on ‘Tools’ and select ‘Root Explorer’ to turn it
on.
on.
4. Superuser will ask you to grant privilege or root
privileges to the app. Allow it.
privileges to the app. Allow it.
5. Now go back to the main screen of
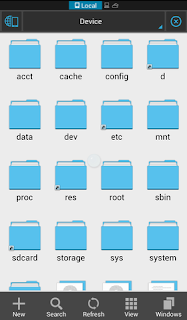
the app and select ‘/’ in the top corner of the screen.
the app and select ‘/’ in the top corner of the screen.
6. Go to system -> bin. Find the busybox
and su file and delete them. If you can’t find any of them, just skip to
the next step.
and su file and delete them. If you can’t find any of them, just skip to
the next step.
7. Go back to system folder then open ‘xbin’ folder and
delete the busybox and su file there (if you found any).
delete the busybox and su file there (if you found any).
8. Now go back to the system folder again and open ‘app’
folder and then delete the supeuser.apk file located in the folder.
That’s all.
folder and then delete the supeuser.apk file located in the folder.
That’s all.
9. Now restart your device and it
should be unrooted.
should be unrooted.
Now that you have been fully unroot, you
can continue with your upgrade.
can continue with your upgrade.


Yomi, how the MTN 3gb infinix hot note jumia thing go be na?
Abi???….We never see d stuff collect even tho boys don collect imei!!!
35410303987531 tweak and send mifi to 131 and u will get ur 3G
prof what about us that rooted with kingroot that has kinguser. i unrooted with the kinguser, and my simple root checker is telling me that my device does not have a proper root access, does that mean am unrooted
Yes you are now unrooted!
please cn yu gve me a guide on how to root innjoo F2 tablet, its runs on android 4.4 and ive tried all the rooting app both mobile and pc but no result.
Follow the link http://wp.me/p5ZG3G-so to solve it.
Please admin I unrooted my infinix hot 2 using the second method and upgraded myphone but I cannot root it again using kingroot….I think those busybox and su which you told me to delete is the cause of the problem