This is a complete tutorial on how to add Facebook Comment box to new Blogger html5. I attribute all kudos to Doncaprio who made available the first FB comment box for the old blogger html codes. I just re-modified it to the new html codes.
I re-modified this tutorial because of much queries from people who need it. So if you had
wanted adding FB comment form to your new blog site but you don’t know how to go about
it, seat tight, get a bottle of coke let’ get the ball rolling.
Go to facebook developers page and click on
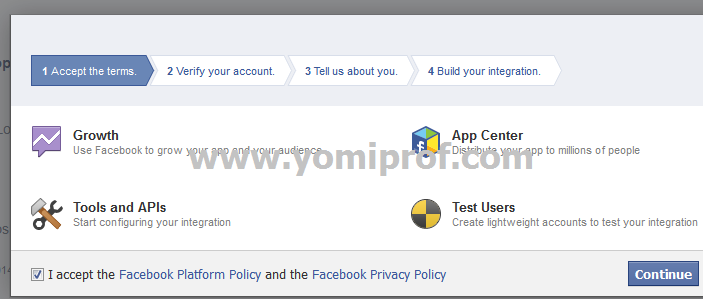
Apps==>Reg as a new developer ==>accepts the terms and services and every
other things that follows
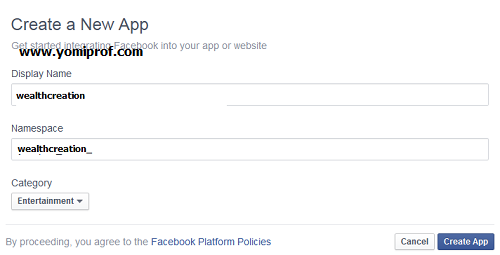
your app name, name space and choose the category of app you want to create,
click on create and enter captcha code
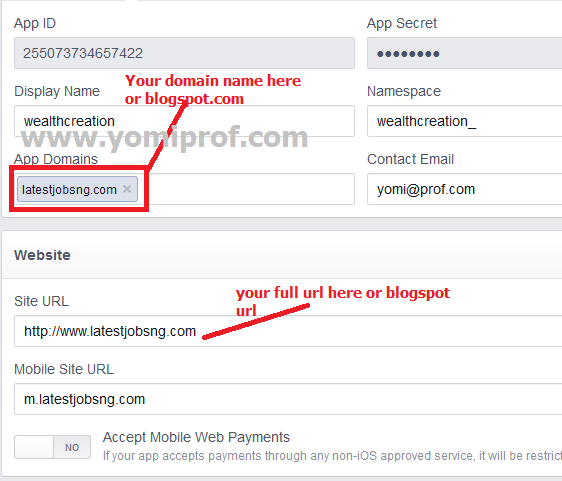
on settings by the left side bar – On the next page, enter your custom domain
name (if you’re using a custom domain) or just blogspot.com (if you’re using
blogspot sub domain) in the space provided for App
domain
add a platform, select website and enter your url address
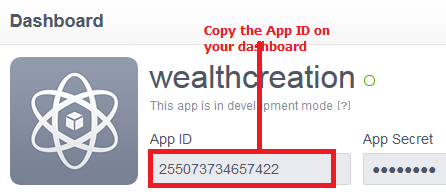
FB app so copy your App ID and place it on notepad so that you won’t forget cos
you’ll be needing it
this up.
i. xmnls attribute
ii. SDK script
iiI. Open graph meta tag
iv. Comment form iframe code
==>Log in to your blogger
account and click on Template > Edit HTML
Scroll
down to the tail end of the third line before this tag > <head> and add this code below
xmlns:fb='http://www.facebook.com/2008/fbml'
Hence, you should be having this after adding the above codes
<html b:version='2' class='v2' expr:dir='data:blog.languageDirection' xmlns='http://www.w3.org/1999/xhtml' xmlns:b='http://www.google.com/2005/gml/b' xmlns:data='http://www.google.com/2005/gml/data' xmlns:expr='http://www.google.com/2005/gml/expr' xmlns:fb='http://www.facebook.com/2008/fbml'>
After then, scroll down and locate this piece of code after the </head> tag
<body expr:class='"loading" + data:blog.mobileClass'>
In the next line, paste this code:
<div id="fb-root">
<script>
window.fbAsyncInit = function() {
FB.init({
appId : 'YOUR APPLICATION ID HERE',
status : true, // check login status
cookie : true, // enable cookies to allow the server to access the session
xfbml : true // parse XFBML
});
};
(function() {
var e = document.createElement('script');
e.src = document.location.protocol + '//connect.facebook.net/en_US/all.js';
e.async = true;
document.getElementById('fb-root').appendChild(e);
}());
</script>
Replace ‘Your App ID Here’ with the Application you copied to your notepad
==>Now, add the open graph meta tag. Search for this code in your template:
</head>
In the line above it, paste this code:
<meta property="fb:app_id" content="YOUR_APP_ID" />
Replace ‘Your App ID’ with thesame you copied
We are almost done just approaching the last part of this tutorial
From
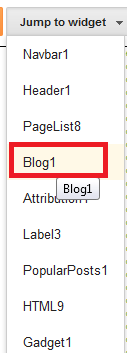
your dashboard, Click on the Jump to widget Tab>>>Click on
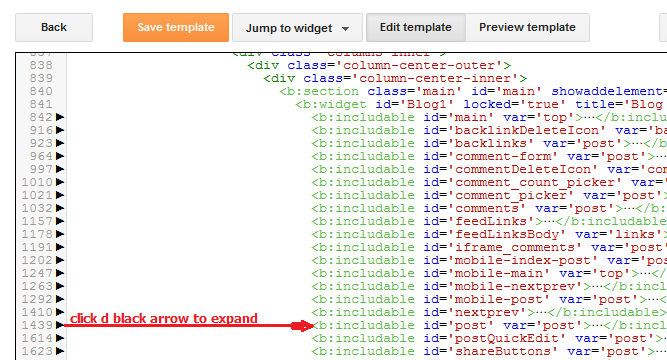
Blog1>>> scroll down to <b:includable id=’post’ and click on the left arrow beside it to expand the codes
==>Look for this piece of code once you’ve expanded the code
<div class='post-footer-line post-footer-line-1'>
In the line just below it, paste this code:
<b:if cond='data:blog.pageType == "item"'>
<style>
.doncaprio-share-buttons
{
-webkit-border-radius: 5px;
-moz-border-radius: 5px;
border-radius: 5px;
border:1px solid #BBBBBB;
background-color:#F2F2F2;
-webkit-box-shadow: #B3B3B3 5px 5px 5px;
-moz-box-shadow: #B3B3B3 5px 5px 5px;
box-shadow: #B3B3B3 5px 5px 5px;
padding: 5px;
margin: 10px;
}
</style>
<p align='center'>
<div class='doncaprio-share-buttons' style='background: #f2f2f2;'>
<font size='6'><strong>Love to hear what you
think!</strong></font> <img
src='http://www.doncaprio.com/wp-content/uploads/2012/08/comment.png'/>
<br/>
<script src='http://connect.facebook.net/en_US/all.js#xfbml=1'/>
<div><fb:comments expr:href='data:post.url'
expr:title='data:post.title' expr:xid='data:post.id'
width='450'/></div>
<div align='right'><a
href='http://www.yomiprof.net/2014/01/how-to-add-facebook-comment-box-to-new.html'
target='blank'><small>[Facebook Comment For
Blogger]</small></a></div>
</div>
</p>
</b:if>
appear live on your blog.
your blog. You get a regular notification on Facebook and you can visit your
blog to reply the comment.
replace YOUR_APP_ID with your real application
ID
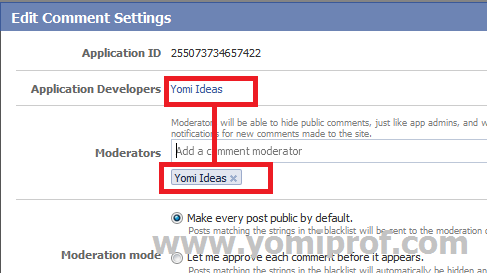
as moderator

Please is Airtel 6 Gigabytes 3000 working, Please if its still working whats the code
It is working ooooooo, To subscribe to the Airtel Blackberry plan, First load 3000 naira airtime and then Dial *440*016# or BBUM3 to 440 and your money will be deducted and your 6GB will be credited.
Hi,
How to copy the codes?
use internet explorer browser and you will be able to copy the code.
Mr Yomi, goidmurni;Please how do I go about rooting HTC amaze 4g…
I'm really sorry for replyin you so late but follow the link below to learn how to root your Htc Amaze 4G below
How to root Htc Amaze 4G
Thanks so much man….m really greatful
thanks it works
You are welcome
The comment box is not showing in web version, how is wrong?
It is showing, have u implemented everything?
Thanks for sharing such a valuable information about adding facebook comment box in our blogs. Social engagement is growing very well so people turn on more social networking website to increase the value of their potential consumers.
Web Design Services USA
HELLOO!!! I CANT COPY ANY OF THE CODES…
Yomi please Facebook is rejecting the blogspot.com App domain. it says top-level domains not allowed. what should i do? help me please
Ooooosssssshhhhh…! why don't you register d domain to. Com?
prof am not yet ready to do so but which domain do u suggest i go with? please visit my blog http://www.currentechinfo.blogspot.com and review for me please am begging you
Thanks for showing me the way.
hello bro, please after adding facebook comment will my original blogger.com comment remain?
Yes, it will remain
it is showing error in the last 3 line of stage 2.
div
p
b:if
the error is "Error parsing XML, line 1576, column 3: The element type "font" must be terminated by the matching end-tag "". Hide notification. " please help.
thanks very much Prof, but sir I didn't see anything To place that URL just after the tag named (head)
NEW MONITORING SYSTEM – The Graduate Pupil Meeting, Scholar Senate, and the Workplace
of Campus Affairs have collaborated with the College Police Department to implement a brand new campus
shuttle and escort monitoring service for riders.
Also visit my web-site: GFE escort website
its shows some errors
Your article is so much effective specially for me. i was searching about it. Now my problem is solved. Thanks for sharing your valuable experience.
Very helpful article for me. Thanks for sharing. Waiting for another one.
nice article. keep it up. Thanks.
Your article is fantastic. It’s very helpful for me. I have achieved a lot of knowledge from your site. Keep it up. I will visit again here.
Very helpful, thanks